


![]() The color of pads.
The color of pads.
![]() Flute springs.
Flute springs.
![]() Is your flute playing up to its potential?
Is your flute playing up to its potential?
![]() Sticky or noisy pads.
Sticky or noisy pads.
![]() Education Clinics
Education Clinics
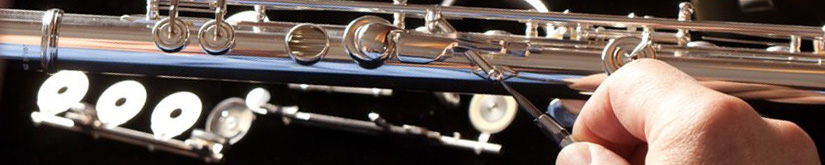
The color of pads.
Pad makers try hard to match the color of skins that they use on their pads so that there is little or no variation, especially within a set that is going on a new flute. Some flutists may have some pads on their flute that are a different shade of yellow than others, the following article explains why this is.
Straubinger Pads, as well as ordinary felt flute pads, are covered with a thin membrane known as gold beaters skin or “fish skin”. This skin, composed mostly of protein, comes from a thin covering that protects the internal organs of cows. This thin membrane has different characteristics depending on the organ it protects. Skins from only a few organs are suitable for making the pads used in musical instruments.
Changes in climatic conditions affect the skin, causing it to expand and shrink. The skins are treated with an organic yellow dye and other chemicals which make the skin air-tight and more stable. The skin texture determines how much dye is absorbed, this is the reason you may notice a difference in color from pad to pad. When producing our pads, we try to match colors as the pads are put in sets for particular manufactures and technicians, but color still varies. This variation does not affect the longevity or performance of the pad.
David Straubinger invented the Straubinger Pad. This article used with permission of David Straubinger.
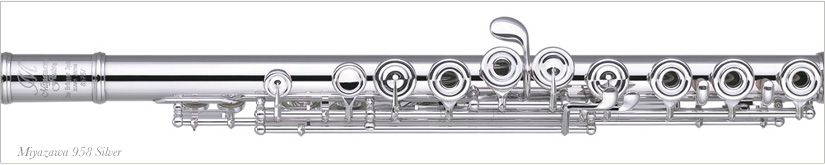
Flute springs.
The materials that flutemakers use for springs have undergone an evolution, particularly during the past 30 years. The advancement in spring materials reflects the flutemaker’s progress toward the most responsive and reliable material for use.
For many years, the only springs available on a handmade or professional flute were that of gold alloy. The primary alternative was a spring made of phosphorus and bronze. Most student and machine-made flutes were equipped with phosphorus and bronze springs due to their low cost. These springs were less reliable and effective than springs of gold alloy as they lacked the tensile strength of gold. *Note: gold springs are an alloy, a mixture of metals. Pure gold is too soft to be used as a spring.
The purpose of a spring is to provide quick response, with a consistent and reliable touch and feel when pressing and releasing a key while playing. As flute making evolved, stainless steel springs replaced those of phosphorus bronze. Japanese flute manufacturers introduced the first flutes employing stainless steel springs. Today, stainless steel springs are the most prevalent spring in use by flutemakers worldwide. Stainless steel is much stronger and has more tensile strength than any other spring material. This tensile strength is what allows technicians to provide a player with extremely light spring/key action while still providing for a quick “positive” feel. Springs with less tensile strength can result in a more “sluggish” feel to the action of the keys. Stainless steel springs can be strengthened or weakened with much more variation and subtleties, therefore achieving a precise key action for each individual. Springs made of stainless steel also maintain their strength and stability over a longer period of time than any other metal.
Another advancement in spring material is that of platinum alloy. Platinum alloy springs have superior tensile strength to those of gold alloy. As with stainless steel, platinum alloy springs allow the technician to adjust spring tension within precise tolerances to each player’s particular preference, and ensure confidence in stability over time.
While spring materials have no impact on the quality of tone in a flute, they do influence action and response of keys. Quick, consistent response of the mechanism is imperative for a comfortable feel and complete reliability in the function of your instrument.
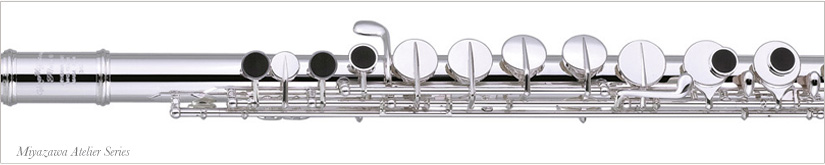
Is your flute playing up to its potential?
Any flute can very slowly go out of adjustment as cork, felt and leather compress and as pads wear, shrink and expand due to changes in temperature and humidity. Additionally, the headjoint cork can shrink over time causing air leakage by the headjoint crown.
Lots of small leaks on several keys are often not as readily apparent as one large one, yet they still affect the response, pitch and focus of the tone almost as much as one big leak. As these problems can creep up over time, they are not as easily noticed so the flutist tends to compensate by pressing harder and/or changing their embouchure. Many times they are unaware that there may be a problem with their flute and assume that the problem is with themselves.
There are a few techniques that you can use in order to determine if your flute is playing up to its potential or not.
A. Checking for pad leaks. The first thing that you can do is visually inspect the pads. Look for tears or spots where the pad has worn through. A flashlight can help with this. Sometimes you can see a small spot of white felt the size of a pin head showing through. That is a leak! Also inspect the pads as you press the key cups down to the toneholes. On professional flutes we seal leaks as narrow as .001″ (one thousandth of one inch) which are very difficult to see with the eye alone. So if you are sure that you can see a leak just with your eyes, then it is probably a fairly large leak as handmade flutes go. Most pads have a ring on them which is dust that collects as the pad is pushed down against the tonehole over and over again. When you are inspecting the pads for leaks with the pad pushed down against the tonehole be sure that you don’t mistake this circle of dust as a leak. The next test you can perform is while you are playing long tones on the flute. Using a very light touch push the keys down very slowly. If the pads are very level and sealing well the tone will “pop out” just as the pad hits the tonehole. If there is a small leak, the tone will start shallowly and will be unfocused as the first part of the pad hits the tonehole, then the strength and focus of the tone will increase as the pad is pushed harder and the remaining portion of the pad hits the tonehole. Using this technique may take a little practice.
A note of caution: Many flutists use cigarette paper to clean their pads by putting the paper between the tonehole and the pad, pushing the pad down and pulling the paper out. Over use of this technique will cause wear and tear on the pad skins. We once saw a 6 month-old flute with virtually every pad worn out because the flutist thought she was doing a good thing by cleaning her pads everyday. For more information on how to clean your pads, please refer to the article, How should I clean my sticky pads?
B. Checking the headjoint cork for leaks. Dip your middle finger in water and place it over the embouchure hole. (The water is to seal the cracks between your fingerprints.) Place your mouth on the open end of the headjoint (the tenon that fits into the flute body). Create a partial vacuum in the tube by sucking on the tube. It usually takes 4 to 6 sucks to remove most of the air. If there is a good seal of the headjoint cork you should be able to maintain the partial vacuum for at least 6 to 8 seconds. If there is a significant leak in the headjoint cork it will be difficult to form suction for more than a second or two. If this is the case you will need a technician to install a new headjoint cork.
C. Bent keys or tubes. Any time that you bend your flute tube or keys, you can be sure that you will have a leak.
D. Lost Motion. Don’t confuse lost motion with a leak. A flute can be in good adjustment as far as the notes coming out clearly, yet the instrument can still have “lost motion”. An example of lost motion would be the following: When you press the A key (2nd finger left hand) the upper B flat key goes down with it. When lost motion exists the upper B flat key does not move exactly at the same time as when you press the A key, but just a 32nd or a 64th of an inch later. This may seem like a small thing, but it makes the action of the flute seem sloppy and imprecise, yet it is not a leak as long as they both hit their toneholes at exactly the same time. The lost motion can be removed by a flute technician.
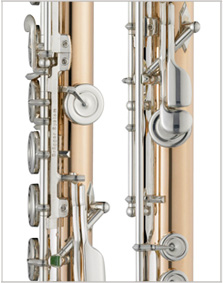
Sticky or noisy pads.
Sticky pads are a common problem among flutists. Sticky pads are caused by dirt and oils which settle onto the pad and the tonehole surfaces. A number of steps can be taken to prevent and alleviate this problem.
The best way to avoid sticky pads is by prevention. This is done by minimizing the introduction of dirt and oils to your flute. Some flutists have a natural body chemistry which results in very high concentrations of acid in the saliva and skin oils. As a precaution, wash your hands thoroughly before playing to reduce the natural oils on the hands and fingers. In addition, brushing your teeth before playing will prolong and protect the life of your pads.
Cleaning of your flute after each playing session is another way to extend the life of your pads and to help prevent sticky pads. Swab the interior of the flute after playing, using a wooden cleaning rod (to prevent scratching the inside of the flute tube) and a 100% cotton cloth. Be sure to avoid “pad saver” types of swabs; while they can clean the tubing well, they are designed to be stored inside the flute tube. This holds moisture against the pads and does not allow them to dry properly. For the exterior of your flute, use a clean, dry cloth to gently wipe fingerprints and oils from the surface of the flute. A microfiber cloth is ideal, while cloths treated with chemicals can actually cause problems with time. Store cleaning cloths outside your flute case and launder your cloths regularly.
Despite such precautions, flutists may still encounter sticky pads. Cleaning your own pads can provide good results, but it must be done carefully to avoid harming your pads.
To effectively clean sticky pads, cigarette paper may be used. Avoid using gummed paper. If only gummed paper is available, cut off the gummed section before use.
- Place a clean sheet of paper between the pad and tonehole.
- Gently press the key cup down against the tonehole.
- Carefully pull on the paper once or twice in extremely small increments to transfer the dirt or oil to the paper from the pad and tonehole.
- Do not pull the paper completely out—this will cause wear and tear on the pad skin.
If the stickiness persists, repeat the procedure with a fresh piece of paper while pulling in a different direction. Care must be taken to avoid overuse of this technique. With frequent use, the friction of the paper being pulled repeatedly over the pad can wear and eventually tear the pad skin. This technique should be used once a week at most, preferably once a month. If this process does not resolve the stickiness, other alternatives may be offered by an authorized technician.
Annual routine maintenance by a professional technician is an important step in pad care. During routine maintenance, your technician will disassemble the flute and clean the pads and toneholes. The condition of the pads will also be checked. Worn or dirty pads will be replaced.
Routine professional maintenance paired with diligent care and cleaning will help to extend pad life while alleviating sticky pads. For more information on caring for your flute pads, see our article Is Your Flute Playing up to Its Potential?, or contact us to schedule maintenance with our professional repair staff.
Education Clinics.
As a service to flute teachers we offer two clinics free of charge:
- Sound and Substance: This class explores how the sound of the flute can be manipulated by changing the specifications of a flute.
- What is wrong with my flute: This class helps students to detect when their flute is not playing up to its potential.
The classes are best suited for high school or college age flutists.

